
- どうも、モト春樹です
- moto
- example
— リポジトリ
— チュートリアル環境
— ec2.py
— tests /ec2_test.py
— setup.py
— テスト
— coverage
—– coverage run
—– coverage report
—– coverage html - Stand-alone Server Mode
— Python 以外の言語ライブラリからも利用可能
— Stand-alone Server Mode インストールと起動
— boto3 からアクセスしてみる - 以上
- 参考
どうも、モト春樹です
尊敬するモト冬樹さんのブログ、「ツルの一声」というタイトルでグッと身近に感じたかっぱです。
ameblo.jp
モト春樹と名乗らせて頂きたいと思います。
moto
昨年後半から今年にかけて boto3 や aws-sdk for ruby を使って、ちょっとしたツールやライブラリを書かせてもらう機会が増えてきました。有難いことなのですが、動作確認を行うあたって、AWS リソースを作ったり、消したりしながら書いていたりすると、いつのまにかソースコードがデグレしていたりして、その非効率さに頭を悩ませていました。
そんな悩みもあり、ツールやライブラリを書いたらユニットテストくらいは書けるようになりたいということで、テストを書くにあたって必要そうなモジュールを調べていたところ、moto という boto3(boto や boto-core) の結果をシュミレートしてくれるモジュールに出会いましたので試してみました。
github.com
moto なのか boto なのかごっちゃになりそうです。
example
リポジトリ
github.com
チュートリアル環境
$ python --version
Python 2.7.13

$ pip list --format=columns | egrep 'moto|boto|coverage'
boto            2.44.0
boto3           1.4.2
botocore        1.4.85
coverage        4.2
moto            0.4.30
ec2.py
インスタンス ID 一覧を取得する簡単なライブラリです。
import boto3

def get_client():
    """
    Returns the ec2 boto3 client
    """
    return boto3.client('ec2')


def list_ec2_instances():
    """
    List EC2 InstanceId
    """
    ec2 = get_client()

    response = ec2.describe_instances()
    if response:
        for res in response.get('Reservations', []):
            for instance in res.get('Instances', []):
                yield instance['InstanceId']

def main():
    """
    Main entry
    """

    for instance in list_ec2_instances():
        print instance

if __name__ == '__main__':
    main()
コマンドラインで実行すると以下のようにインスタンス ID がヅラヅラ〜と表示されるだけです。
$ python ec2.py
i-12345678901234567
i-12345678
i-xxxxxxxxxxxxxxxxx
tests/ec2_test.py
以下のようにテストを書きました。
ポイントは各テストケースにデコレータとして mock_ec2を付与している部分。また、__moto_setup でダミーの EC2 インスタンスをrun_instancesしている部分だと思います。
import sys
import os
import StringIO
import unittest
from moto import mock_ec2
from ec2 import get_client, list_ec2_instances, main

class Ec2TestCase(unittest.TestCase):

    def setUp(self):
        """
        setUp will run before execution of each test case
        """
        pass

    @mock_ec2
    def __moto_setup(self):
        """
        Run Instance
        """
        ec2 = get_client()
        reservation = ec2.run_instances(ImageId='ami-f00ba4', MinCount=1, MaxCount=1)
        self.instance_id = reservation['Instances'][0]['InstanceId']

    def tearDown(self):
        """
        tearDown will run after execution of each test case
        """
        pass

    @mock_ec2
    def test_get_client(self):
        """
        check that out get_client function has a valid endpoint
        """
        ec2 = get_client()
        self.assertEqual(ec2._endpoint.host, 'https://ec2.ap-northeast-1.amazonaws.com')

    @mock_ec2
    def test_list_ec2_instances(self):
        """
        check that our bucket shows as expected
        """
        instances = [e for e in list_ec2_instances()]
        self.assertEqual([], instances)

    @mock_ec2
    def test_main(self):
        """
        verifies the execution of the main function
        """
        # setup ec2 environment
        self.__moto_setup()

        # capture stdout for processing
        sys.stdout = mystdout = StringIO.StringIO()

        # run main function
        main()

        content = mystdout.getvalue()
        self.assertEqual(self.instance_id, content.strip())
setup.py
setup.py 自体は初めて書く機会を得ましたが、Ruby で言うところの rake の Rakefile みたいなものなのかなという理解です。今後、もう少し深掘りしていきたいと思います。
この setup.py を利用してテストを実行することになります。
from setuptools import setup, find_packages

setup(
    name='oreno-pj2',
    version='0.0.1',

    description="Oreno Sample Project",
    license='GPLv2',

    author='inokappa',
    author_email='xxxxxxxxxxxxxxxxxx',

    packages=find_packages(
        exclude=['tests']
    ),

    test_suite='tests',

    install_requires=[
        'boto3'
    ],

    tests_require=[
        'moto'
    ],

    entry_points={
        'console_scripts': [
            'ec2 = ec2:main'
        ]
    },
)
テスト
早速、テストを実行してみたいと思います。
$ python setup.py test
以下のように結果が出力されます。
$ python setup.py test
running test
running egg_info
writing requirements to oreno_pj2.egg-info/requires.txt
writing oreno_pj2.egg-info/PKG-INFO
writing top-level names to oreno_pj2.egg-info/top_level.txt
writing dependency_links to oreno_pj2.egg-info/dependency_links.txt
writing entry points to oreno_pj2.egg-info/entry_points.txt
writing manifest file 'oreno_pj2.egg-info/SOURCES.txt'
running build_ext
test_get_client (tests.ec2_test.Ec2TestCase) ... ok
test_list_ec2_instances (tests.ec2_test.Ec2TestCase) ... ok
test_main (tests.ec2_test.Ec2TestCase) ... ok

----------------------------------------------------------------------
Ran 3 tests in 0.357s

OK
いい感じです。
coverage
その名の通り、Python コードのカバレッジを計測するモジュールです。
coverage を利用することで、テストを実行してカバレッジの計測や計測した結果を HTML 等でも表示することが出来ます。
coverage run
coverage run で Python スクリプトを実行させることが出来ます。
$ coverage run setup.py test
以下のように出力されます。
running test
running egg_info
writing requirements to oreno_pj2.egg-info/requires.txt
writing oreno_pj2.egg-info/PKG-INFO
writing top-level names to oreno_pj2.egg-info/top_level.txt
writing dependency_links to oreno_pj2.egg-info/dependency_links.txt
writing entry points to oreno_pj2.egg-info/entry_points.txt
writing manifest file 'oreno_pj2.egg-info/SOURCES.txt'
running build_ext
test_get_client (tests.ec2_test.Ec2TestCase) ... ok
test_list_ec2_instances (tests.ec2_test.Ec2TestCase) ... ok
test_main (tests.ec2_test.Ec2TestCase) ... ok

----------------------------------------------------------------------
Ran 3 tests in 0.718s

OK
coverage report
coverage report でカバレッジのレポートを確認することが出来ます。
$ coverage report -m -i --omit=${除外したいパスを記載}
以下のように出力されます。
Name                Stmts   Miss  Cover   Missing
-------------------------------------------------
ec2.py                 15      1    93%   31
setup.py                2      0   100%
tests/__init__.py       0      0   100%
tests/ec2_test.py      27      0   100%
-------------------------------------------------
TOTAL                  44      1    98%
coverage html
coverage html ではcoverage reportの結果を HTML で出力させることが出来ます。
$ coverage html --omit=${除外したいパスを記載}
実行しても何も出力されませんが、以下のように htmlconv ディレクトリ以下のindex.htmlをブラウザで開くとカバレッジの結果が HTML で確認することが出来ます。
$ open htmlcov/index.html
以下のようにブラウザで確認することが出来ます。
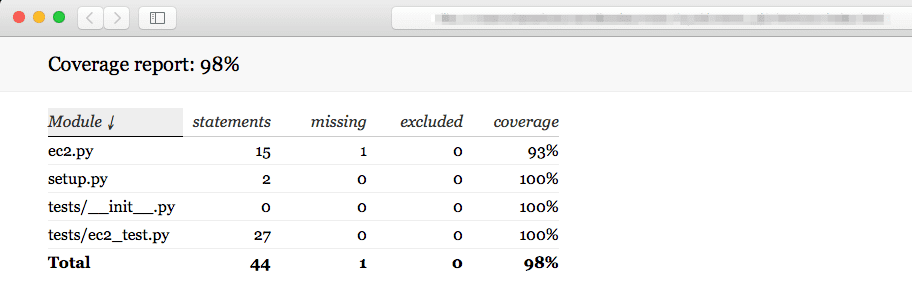
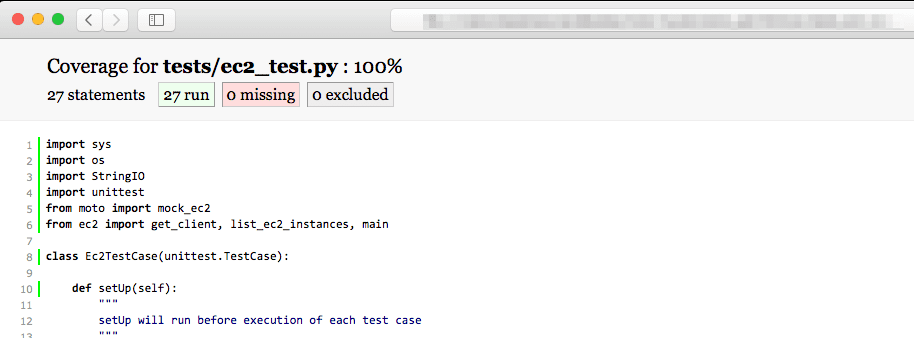
Moduleを項目をクリックすると、各プログラム毎のカバレッジを確認することが出来ます。
Stand-alone Server Mode
Python 以外の言語ライブラリからも利用可能
moto には Stand-alone Server Mode というモードが存在していて、Flask で実装された API サーバーを起動することが出来ます。この Stand-alone Server Mode を利用することで、Python 以外の言語ライブラリでも moto が利用出来るようになるとのことです。
Stand-alone Server Mode インストールと起動
インストールは以下のように。
$ cat requirements.txt
moto[server]

$ pip install -r requirements.txt
起動は以下のように。
$ moto_server ec2
 * Running on http://127.0.0.1:5000/ (Press CTRL+C to quit)
boto3 からアクセスしてみる
以下のような EC2 インスタンスのリストを取得するようなコードを利用します。
import boto3

ec2 = boto3.resource('ec2', region_name='us-west-1', endpoint_url='http://localhost:5000')
for instance in ec2.instances.all():
   print instance
実行すると以下のような結果が出力されます。
$ python test.py
ec2.Instance(id='i-xxxxxxx1')
ec2.Instance(id='i-xxxxxxx2')
ec2.Instance(id='i-xxxxxxx3')
ec2.Instance(id='i-xxxxxxx4')
ec2.Instance(id='i-xxxxxxx5')
先に起動した moto_server には以下のようなログが記録されています。
$ moto_server ec2
 * Running on http://127.0.0.1:5000/ (Press CTRL+C to quit)
127.0.0.1 - - [18/Apr/2017 08:12:14] "POST / HTTP/1.1" 200 -
127.0.0.1 - - [18/Apr/2017 08:12:28] "POST / HTTP/1.1" 200 -
...
127.0.0.1 - - [18/Apr/2017 08:20:42] "POST / HTTP/1.1" 200 -
以上
モト春樹が moto をチュートリアルしてみました。
Python でテストを書いた事がそもそも無いのでテストの書き方から学ぶ必要がありましたが、思ったよりも簡単にモックを使ったテストを書くことが出来ました。これから少しずつですが、自分が書くツールやライブラリでは moto を使ったテストも合わせて実装するようにしたいと思います。
参考
- https://ameblo.jp/moto-fuyuki/
- https://blog.hipchat.com/2017/03/08/better-python-testing-mocking-aws/
- https://bitbucket.org/jeffreyness/sample_project