
引き続き
Eryastic の話し。
github.com
コマンドラインツールとは言え
所詮は手作業なので、意図した構成であるかの確認については他のツールに委ねたいという思いがあり、ドメイン作成、削除、更新時には awspec でテスト出来るように spec ファイルを吐くようにしてみました。
github.com
例えば
Amazon Elasticsearch Service ドメインを作成
$ AWS_PROFILE=xxxxxx AWS_REGION=ap-northeast-1 bundle exec eryastic domain --create --config-file=demo-es1.toml
I, [2017-04-16T13:24:26.961332 #23293]  INFO -- : 以下の構成で Elasticsearch ドメインを作成します.
+-------------------------------+------------------------------------------------------------------------------+
| key                           | value                                                                        |
+-------------------------------+------------------------------------------------------------------------------+
| domain_name                   | demo-es1                                                                     |
| elasticsearch_version         | 2.3                                                                          |
...
| volume_size                   | 10                                                                           |
| automated_snapshot_start_hour | 1                                                                            |
+-------------------------------+------------------------------------------------------------------------------+
処理を続行しますか ? [y|n]:
y
I, [2017-04-16T13:24:38.136936 #23293]  INFO -- : 処理を続行します.
I, [2017-04-16T13:24:39.429898 #23293]  INFO -- : 処理が成功しました.
作成が開始されると、spec ディレクトリには deploy_spec.rb というファイルが生成されています。(事前に spec ディレクトリを作っておいてください。)
bash-3.2$ tree spec/
spec/
├── deploy_spec.rb
└── spec_helper.rb

0 directories, 2 files
実際に awspec を実行してみると…
bash-3.2$ AWS_PROFILE=xxxxx AWS_REGION=ap-northeast-1 bundle exec rake spec:deploy
...

elasticsearch 'demo-es1'
  should exist
  should have access policies "{\n  \"Version\": \"2012-10-17\",\n  \"Statement\": [\n    {\n      \"Sid\": \"\",\n      \"Effect\"...pAddress\": {\n          \"aws:SourceIp\": \"xxx.xxx.xxx.xxx\"\n        }\n      }\n    }\n  ]\n}\n"
  elasticsearch_cluster_config.instance_type
    should eq "t2.micro.elasticsearch"
  elasticsearch_cluster_config.instance_count
    should eq 3
  elasticsearch_cluster_config.dedicated_master_enabled
    should eq false
  elasticsearch_cluster_config.zone_awareness_enabled
    should eq false
  ebs_options.ebs_enabled
    should eq true
  ebs_options.volume_type
    should eq "gp2"
  ebs_options.volume_size
    should eq 10
  snapshot_options.automated_snapshot_start_hour
    should eq 1
  domain_name
    should eq "demo-es1"
  elasticsearch_version
    should eq "2.3"

Finished in 0.56487 seconds (files took 1.96 seconds to load)
12 examples, 0 failures
いい感じです。
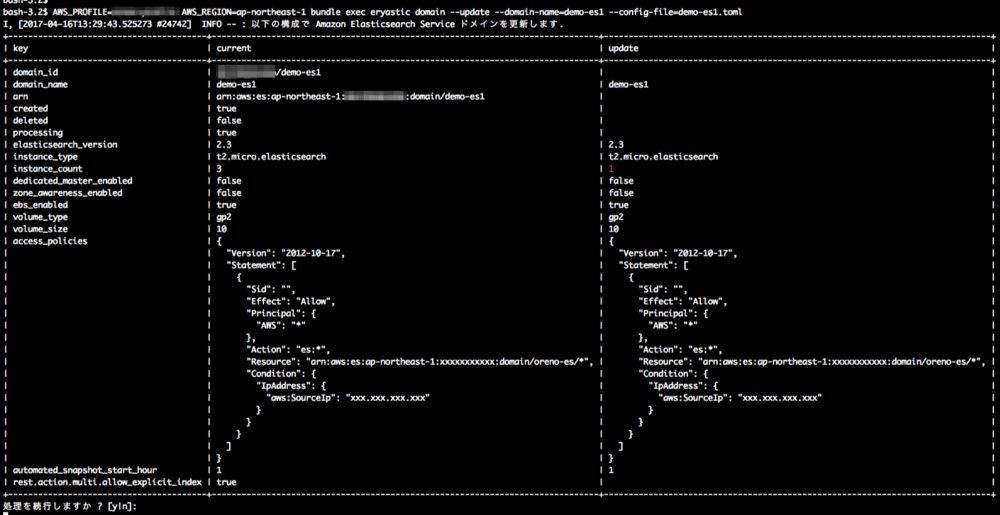
作成したドメインを更新
次にインスタンス数を減らしてみたいと思います。
AWS_PROFILE=xxxxx AWS_REGION=ap-northeast-1 bundle exec eryastic domain --update --domain-name=demo-es1 --config-file=demo-es1.toml
以下のように出力されます。
更新処理が開始されると、spec ディレクトリには deploy_spec.rb というファイルが生成されています。(既存の deploy_spec.rb は上書きされます。)
bash-3.2$ tree spec/
spec/
├── deploy_spec.rb
└── spec_helper.rb

0 directories, 2 files
テストを流してみます。
bash-3.2$ AWS_PROFILE=xxxxxx AWS_REGION=ap-northeast-1 bundle exec rake spec:deploy
...

elasticsearch 'demo-es1'
  should exist
  should have access policies "{\n  \"Version\": \"2012-10-17\",\n  \"Statement\": [\n    {\n      \"Sid\": \"\",\n      \"Effect\"...pAddress\": {\n          \"aws:SourceIp\": \"xxx.xxx.xxx.xxx\"\n        }\n      }\n    }\n  ]\n}\n"
  elasticsearch_cluster_config.instance_type
    should eq "t2.micro.elasticsearch"
  elasticsearch_cluster_config.instance_count
    should eq 1
  elasticsearch_cluster_config.dedicated_master_enabled
    should eq false
  elasticsearch_cluster_config.zone_awareness_enabled
    should eq false
  ebs_options.ebs_enabled
    should eq true
  ebs_options.volume_type
    should eq "gp2"
  ebs_options.volume_size
    should eq 10
  snapshot_options.automated_snapshot_start_hour
    should eq 1
  domain_name
    should eq "demo-es1"

Finished in 0.47943 seconds (files took 1.93 seconds to load)
11 examples, 0 failures
実際の構成変更については少々時間がかかる為、マネジメントコンソール上で確認するとインスタンス数は変わっていないかもしれませんが、API 上では意図したインスタンス数になっていることは確認することが出来ます。
ドメインを削除
ドメインを削除してみます。
bash-3.2$ AWS_PROFILE=oreno-profile AWS_REGION=ap-northeast-1 bundle exec eryastic domain --delete --domain-name=demo-es1
I, [2017-04-16T13:36:00.514878 #26010]  INFO -- : 以下の Amazon Elasticsearch Service ドメインを削除します.
+----------------------------------------+------------------------------------------------------------------------------+
| key                                    | value                                                                        |
+----------------------------------------+------------------------------------------------------------------------------+
| domain_id                              | 044703681656/demo-es1                                                        |
| domain_name                            | demo-es1                                                                     |
...
| automated_snapshot_start_hour          | 1                                                                            |
| rest.action.multi.allow_explicit_index | true                                                                         |
+----------------------------------------+------------------------------------------------------------------------------+
処理を続行しますか ? [y|n]:
y
I, [2017-04-16T13:36:04.319120 #26010]  INFO -- : 処理を続行します.
I, [2017-04-16T13:36:05.091255 #26010]  INFO -- : 処理が成功しました.
削除処理が開始されると、spec ディレクトリには delete_spec.rb というファイルが生成されています。
bash-3.2$ tree spec/
spec/
├── delete_spec.rb
├── deploy_spec.rb
└── spec_helper.rb

0 directories, 3 files
テストを流してみます。
bash-3.2$ AWS_PROFILE=xxxxx AWS_REGION=ap-northeast-1 bundle exec rake spec
...

elasticsearch 'demo-es1'
  should not exist (FAILED - 1)

elasticsearch 'demo-es1'
  should exist
  should have access policies "{\n  \"Version\": \"2012-10-17\",\n  \"Statement\": [\n    {\n      \"Sid\": \"\",\n      \"Effect\"...pAddress\": {\n          \"aws:SourceIp\": \"xxx.xxx.xxx.xxx\"\n        }\n      }\n    }\n  ]\n}\n"
  elasticsearch_cluster_config.instance_type
    should eq "t2.micro.elasticsearch"
  elasticsearch_cluster_config.instance_count
    should eq 1
  elasticsearch_cluster_config.dedicated_master_enabled
    should eq false
  elasticsearch_cluster_config.zone_awareness_enabled
    should eq false
  ebs_options.ebs_enabled
    should eq true
  ebs_options.volume_type
    should eq "gp2"
  ebs_options.volume_size
    should eq 10
  snapshot_options.automated_snapshot_start_hour
    should eq 1
  domain_name
    should eq "demo-es1"

Failures:

  1) elasticsearch 'demo-es1' should not exist
     Failure/Error: it { should_not exist }
       expected elasticsearch 'demo-es1' not to exist
     # ./spec/delete_spec.rb:3:in `block (2 levels) in '

Finished in 1.13 seconds (files took 1.68 seconds to load)
12 examples, 1 failure

Failed examples:

rspec ./spec/delete_spec.rb:3 # elasticsearch 'demo-es1' should not exist
まだ、完全に削除が完了していない為でしょうか、delete_spec.rb のテストは Failure となってしまいますし、削除したにも関わらず deploy_spec.rb のテストはSuccessとなってしまいますので注意が必要です。暫く時間を置いてからdelete_spec.rb だけを実行してみたいと思います。
以上
eryastic 自体は toml で Amazon Elasticsearch Service の構成を管理する事は出来るので、awspec の spec ファイルを書くことを考えるとコードの二重管理問題が発生しそうですが、自動で吐くようにすることで二重管理問題から解放されて、且つ、環境が意図した内容で構築出来ていることを第三者(第三のツール)の視点で確認出来るというメリットはあると考えています。
余談になりますが、先日 awspec のコミット権を頂きましたので、今後も awspec を頑張っていきつつ Ruby 力を高めていければと考えています。