tl;dr
当然、前回の続きということでシリーズ化。
今回は以下の環境で引き続き進める。
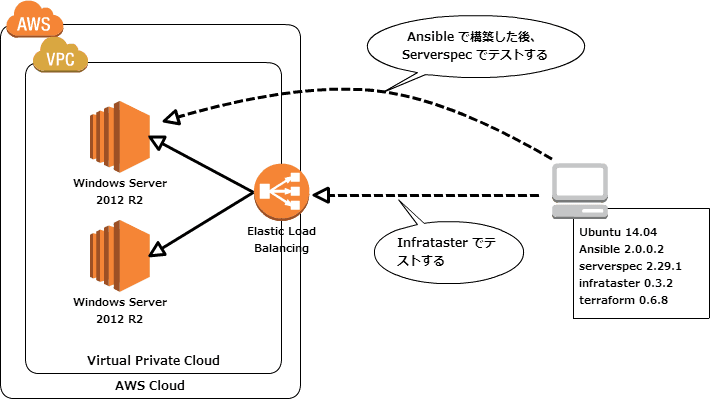
ELB を追加、ELB のバックエンドに EC2 を 2 台という構成。(AWS 環境の構築には Terraform を利用するが、利用方法等については割愛)
参考
- http://docs.ansible.com/ansible/list_of_windows_modules.html
- http://serverspec.org/resource_types.html
- http://rrreeeyyy.com/blog/2014/05/12/serverspec-and-infrataster/
- http://opcdiary.net/?p=29576
IIS を Ansible でセットアップしてみる
教材
github.com
モジュール
IIS をセットアップするには Ansible の以下のモジュールを利用する。
Windows 向けのモジュールが多数用意されているので、そこそこの事は Ansible で出来るんだなと独りで納得。
Playbook
特に難しいことは無く、win_feature に記載されたサンプルをそのまま写経。
$ cat roles/iis/tasks/main.yml
- name: Install IIS
  win_feature:
    name: "Web-Server"
    state: present
    restart: yes
    include_sub_features: yes
    include_management_tools: yes
roles 配下におく。
$ tree --charset=x .
.
|-- default.yml
|-- hosts
`-- roles
    `-- iis
        `-- tasks
            `-- main.yml

3 directories, 3 files
適用
Playbook を適用してみる。
#
# チェック
#
$ ansible-playbook -i hosts default.yml --check

PLAY ***************************************************************************

TASK [iis : Install IIS] *******************************************************
skipping: [ec2-xx-xx-xxx-xx.ap-northeast-1.compute.amazonaws.com]

PLAY RECAP *********************************************************************
ec2-xx-xx-xxx-xx.ap-northeast-1.compute.amazonaws.com : ok=0    changed=0    unreachable=0    failed=0

#
# 適用
#
$ ansible-playbook -i hosts default.yml

PLAY ***************************************************************************

TASK [iis : Install IIS] *******************************************************
changed: [ec2-xx-xx-xxx-xx.ap-northeast-1.compute.amazonaws.com]

PLAY RECAP *********************************************************************
ec2-xx-xx-xxx-xx.ap-northeast-1.compute.amazonaws.com : ok=1    changed=1    unreachable=0    failed=0
ひとまず確認
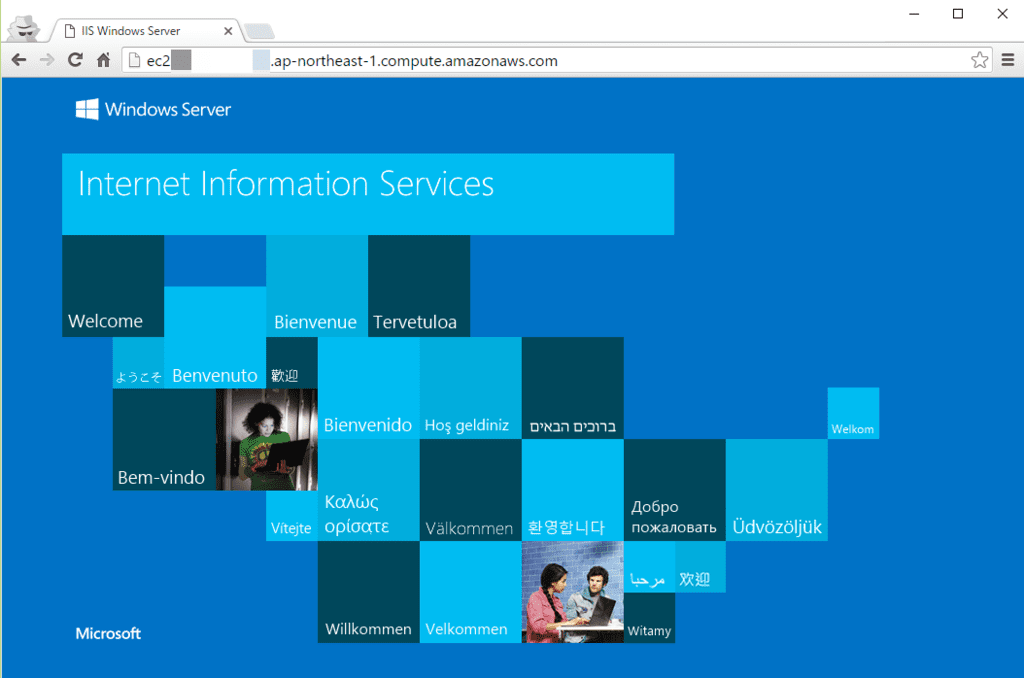
おお。
Serverspec で確認する
目視での確認をソコソコに…
今回のように一台セットアップ後の確認は手動で目視も悪くないと思うけど、2 台以上確認が必要であれば Serverspec を使いたい。また、Web サイトをユーザーアクセスを想定したアクセスで確認したい場合には Infrataster を使いたいということで、Serverspec で IIS が動いていることを確認しつつ、Infrataster を使って Web サイトが表示されていることを確認する。
引き続き教材は
github.com
Serverspec のセットアップ
以下のように serverspec-init を実行して Serverspec を使えるようにセットアップする。
$ pwd
~/sample-ansible-win$

$ bundle install --path vendor/bundle
$ bundle exec serverspec-init
Select OS type:

  1) UN*X
  2) Windows

Select number: 2

Select a backend type:

  1) WinRM
  2) Cmd (local)

Select number: 1

Input target host name: iis
 + spec/
 + spec/iis/
 + spec/iis/sample_spec.rb
 + spec/spec_helper.rb
 + Rakefile
 + .rspec

$ ls -ltr
total 20
-rw-rw-r-- 1 vagrant vagrant  186 Jan 24 17:54 hosts
drwxrwxr-x 3 vagrant vagrant 4096 Jan 24 18:19 roles
-rw-rw-r-- 1 vagrant vagrant   54 Jan 24 18:26 default.yml
drwxrwxr-x 3 vagrant vagrant 4096 Jan 24 18:45 spec
-rw-rw-r-- 1 vagrant vagrant  685 Jan 24 18:45 Rakefile
Serverspec はロール単位でテストを行いたいので、Advanced Tips を参考にして以下のように Rakefile を書き換える。
require 'rake'
require 'rspec/core/rake_task'
require 'yaml'

properties = YAML.load_file('properties.yml')

desc "Run serverspec to all hosts"
task :spec => 'serverspec:all'

namespace :serverspec do
  task :all => properties.keys.map {|key| 'serverspec:' + key.split('.')[0] }
  properties.keys.each do |key|
    desc "Run serverspec to #{key}"
    RSpec::Core::RakeTask.new(key.split('.')[0].to_sym) do |t|
      ENV['TARGET_HOST'] = key
      ENV['USERNAME'] = properties[key][:username]
      ENV['PASSWORD'] = properties[key][:password]
      t.pattern = 'spec/{' + properties[key][:roles].join(',') + '}/*_spec.rb'
    end
  end
end
更に Infrataster のテストも行いたいので、こちらの記事を参考にさせて頂いて spec/spec_helper.rb を以下のように書き換える。
require 'serverspec'
require 'winrm'
require 'infrataster/rspec'
require 'yaml'

set :backend, :winrm

properties = YAML.load_file('properties.yml')

host = ENV['TARGET_HOST']
set_property properties[host]

Infrataster::Server.define(properties[host][:name], host)

user = ENV['USERNAME']
pass = ENV['PASSWORD']
endpoint = "http://#{ENV['TARGET_HOST']}:5985/wsman"

winrm = ::WinRM::WinRMWebService.new(endpoint, :ssl, :user => user, :pass => pass, :basic_auth_only => true)
winrm.set_timeout 300 # 5 minutes max timeout for any operation
Specinfra.configuration.winrm = winrm
テスト対象となるホストや ELB のエンドポイントの情報(ホスト名、ロール名等)を properties.yml に持たせておいて、set_property properties[host] で host をキーにして各種情報を後述の各テストファイルで利用することが出来る。こちらも Advanced Tips に掲載されている。
Windows Server に対して Serverspec でテスト出来るようにする
こちらの記事を参考にさせて頂いて、PowerShell を使って以下を実行する。
# Refer to http://opcdiary.net/?p=29576
#
# PowerShellで外部スクリプトを実行可能にする
Set-ExecutionPolicy -ExecutionPolicy "RemoteSigned" -Force
Get-ExecutionPolicy

# リモートアクセスを有効にする
Enable-PSRemoting -Force

# タイムアウト設定
Set-Item -Path "WSMan:localhostMaxTimeoutms" 1800000
Get-Item -Path "WSMan:localhostMaxTimeoutms"

# 暗号化されていない接続を許可
Set-Item -Path "WSMan:localhostServiceAllowUnencrypted" "true"
Get-Item -Path "WSMan:localhostServiceAllowUnencrypted"

# Basic認証を許可
Set-Item -Path "WSMan:localhostServiceAuthBasic" "true"
Get-Item -Path "WSMan:localhostServiceAuthBasic"
各パラメータが何を意味しているのかは後ほどちゃんと調べたい。
テストを書く
以下のようなディレクトリ構成となる。
$ tree --charset=x spec
spec
|-- iis
|   `-- iis_spec.rb
|-- spec_helper.rb
`-- web
    `-- web_spec.rb

2 directories, 3 files
iis/iis_spec.rb は以下のように。
$ cat spec/iis/iis_spec.rb
require 'spec_helper'

describe port(80) do
  it { should be_listening }
end

describe iis_website('Default Web Site') do
  it{ should exist }
end

describe iis_website('Default Web Site') do
  it{ should be_enabled }
end

describe iis_website('Default Web Site') do
  it{ should be_running }
end
web/web_spec.rb は以下のように。
$ cat spec/web/web_spec.rb
require 'spec_helper'

describe server(property[:name]) do
  describe http('http://' + ENV['TARGET_HOST']) do
    it "responds as 'text/html'" do
      expect(response.headers['content-type']).to match(%r{^text/html})
    end
    it "responds as '200'" do
      expect(response.status).to be 200
    end
  end
end
こちらのテストは Infrataster で実行されるテストとなる。
テスト対象の設定
以下のようにテストの対象となるホスト、ELB のエンドポイントを properties.yml に書く。
$ cat properties.yml.sample
ec2-xx-xx-xx-x1.ap-northeast-1.compute.amazonaws.com:
  :username: 'User'
  :password: 'xxxxxxxxxxxxxxxxxxx'
  :name: :web01
  :roles:
    - iis
    - web

ec2-xx-xx-xx-x1.ap-northeast-1.compute.amazonaws.com:
  :username: 'User'
  :password: 'xxxxxxxxxxxxxxxxxxx'
  :name: :web02
  :roles:
    - iis
    - web

iis-elb-xxxxxxxxxxxxxxxxxxx.ap-northeast-1.elb.amazonaws.com:
  :name: :app
  :roles:
    - web
テストの実行
以下のようにテストを実行する。
#
# タスクの確認
#
$ bundle exec rake -T
rake serverspec:ec2-xx-xx-xx-x1               # Run serverspec to ec2-xx-xx-xx-x1.ap-northeast-1.compute.amazonaws.com
rake serverspec:ec2-xx-xx-xx-x2               # Run serverspec to ec2-xx-xx-xx-x2.ap-northeast-1.compute.amazonaws.com
rake serverspec:iis-elb-xxxxxxxxxxxxxxxxxxx   # Run serverspec to iis-elb-xxxxxxxxxxxxxxxxxxx.ap-northeast-1.elb.amazonaws.co
rake spec                                     # Run serverspec to all hosts

#
# テストの実行
#
$ bundle exec rake spec

(snip)

Port "80"
 WARN  WinRM::WinRMWebService : WinRM::WinRMWebService#run_powershell_script is deprecated. Use WinRM::CommandExecutor#run_powershell_script instead
  should be listening

IIS Website "Default Web Site"
 WARN  WinRM::WinRMWebService : WinRM::WinRMWebService#run_powershell_script is deprecated. Use WinRM::CommandExecutor#run_powershell_script instead
  should exist

(snip)

server 'web02'
  http 'http://ec2-xx-xx-xx-x2.ap-northeast-1.compute.amazonaws.com' with {:params=>{}, :method=>:get, :headers=>{}}
    responds as 'text/html'
    responds as '200'

Finished in 5.32 seconds (files took 0.63342 seconds to load)
6 examples, 0 failures

(snip)

server 'app'
  http 'http://iis-elb-xxxxxxxxxxxxxxxxxx.ap-northeast-1.elb.amazonaws.com' with {:params=>{}, :method=>:get, :headers=>{}}
    responds as 'text/html'
    responds as '200'

Finished in 0.20204 seconds (files took 0.63369 seconds to load)
2 examples, 0 failures
WARN WinRM::WinRMWebService : WinRM::WinRMWebService#run_powershell_script is deprecated. Use WinRM::CommandExecutor#run_powershell_script instead のワーニングが気になる(後で調べる)ところではあるがテストが何とか通った。
以上
todo
- Ansible や Serverspec 等(Chef も含む)を Windows に適用する際の WinRM 回りの設定について整理する
WARN WinRM::WinRMWebService : WinRM::WinRMWebService#run_powershell_script is deprecated. Use WinRM::CommandExecutor#run_powershell_script insteadのワーニングについて調べる
ひとまず
- Windows Server を Ansible で構成管理出来るようにする
- Ansible で IIS をセットアップしてみる
- セットアップアップした内容を Serverspec でテストする
1 ~ 3 までは出来た気がするので引き続き 4 の「EC2 の起動も Ansible で管理する」をやってみたい。
以上。
元記事はこちら
「Ansible で Windows Server の構成管理(2)~ IIS を Ansible でセットアップしてから Serverspec と Infrataster で一通りテストしてみる~」