すでに、@j3tm0t0さんの
また、@matetsuさんの
といった記事がありますが、改めて現在の最新の環境(Vyatta Core 6.6 R1)で試してみました。
今回は下記のような、あるVPCのVyattaが、もう一つのVPCに”VPN Connection”を張り、その中のEC2と疎通(ping)できることを確認してみました。
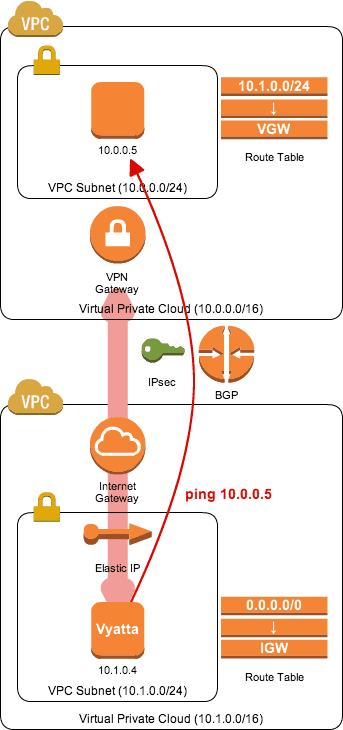
当然、前提として上記のVPC(Subnet / Routing Table / …)は事前に用意しておきます。
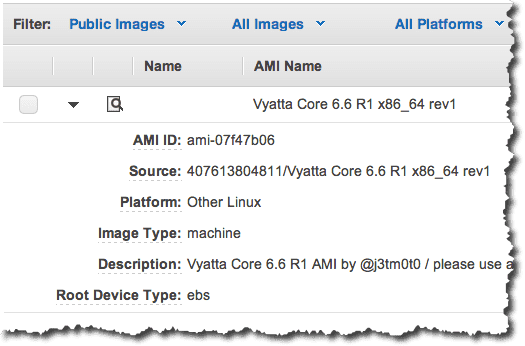
Vyattaはすでに、”@j3tm0t0“さんのAMI(ami-07f47b06)を利用させていただきました。
そしてVyattaに関連づけたEIPのIPアドレスで接続側のVPC(10.0.0.0/16)に”Customer Gateway”を作成します。(今回はBGPの方です)

“Customer Gateway”を作成したら、”VPN Gateway”( Virtual Private Gateway)と関連付けて”VPN Connection”を作成し、Vyattaの設定ファイルをダウンロードします。
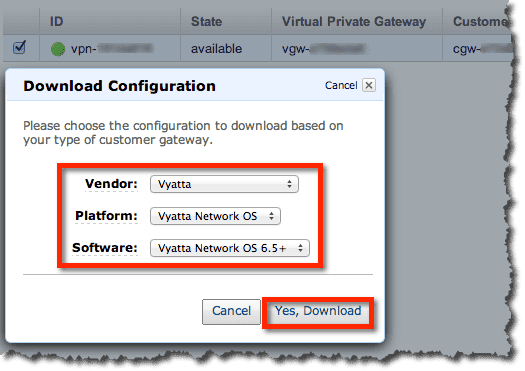
ダウンロードしたファイルより、接続環境(IPsec / BGP)を確認することができます。
▼ 共通の情報
Vyatta Provate IP Address   : 10.1.0.4
Customer Gateway ASN     : 65001
Virtual Private Gateway ASN : 10124
Advertise Network           : 10.1.0.0/24
▼ Tunnel1の情報
Virtual Private Gateway     : 27.0.1.16
Customer Gateway            : 169.254.252.26/30
Virtual Private Gateway     : 169.254.252.25/30
Neighbor IP Address         : 169.254.252.25
Pre-Shared Key              : XXXXXXXX
▼ Tunnel2の情報
Virtual Private Gateway     : 27.0.1.144
Customer Gateway            : 169.254.252.30/30
Virtual Private Gateway     : 169.254.252.29/30
Neighbor IP Address         : 169.254.252.29
Pre-Shared Key              : YYYYYYYY
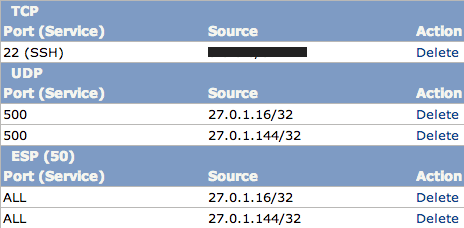
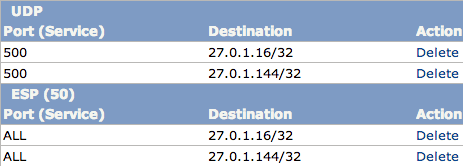
VyattaのVPN設定を行う前に、VPC(10.0.0.0/16)とVPN接続の通信ができるように、セキュリティグループを事前に設定しておきます。
Inbound、Outbound、ともにUDPの500とEPS(50)を二つ”VPN Gateway”( Virtual Private Gateway)のIPアドレス(27.0.1.16、27.0.1.144)に対して許可しておきます。
準備が終わったら、いよいよVyattaでVPNの設定を行います。
▼ 共通の設定
set protocols bgp 65001 network 10.1.0.0/24

set vpn ipsec ipsec-interfaces interface 'eth0'

set vpn ipsec ike-group AWS lifetime '28800'
set vpn ipsec ike-group AWS proposal 1 dh-group '2'
set vpn ipsec ike-group AWS proposal 1 encryption 'aes128'
set vpn ipsec ike-group AWS proposal 1 hash 'sha1'
set vpn ipsec ike-group AWS dead-peer-detection action 'restart'
set vpn ipsec ike-group AWS dead-peer-detection interval '15'
set vpn ipsec ike-group AWS dead-peer-detection timeout '30'

set vpn ipsec esp-group AWS compression 'disable'
set vpn ipsec esp-group AWS lifetime '3600'
set vpn ipsec esp-group AWS mode 'tunnel'
set vpn ipsec esp-group AWS pfs 'enable'
set vpn ipsec esp-group AWS proposal 1 encryption 'aes128'
set vpn ipsec esp-group AWS proposal 1 hash 'sha1'
▼ Tunnel1の設定
set interfaces vti vti0 address '169.254.252.26/30'
set interfaces vti vti0 description 'VPC tunnel 1'
set interfaces vti vti0 mtu '1436'

set vpn ipsec site-to-site peer 27.0.1.16 authentication mode 'pre-shared-secret'
set vpn ipsec site-to-site peer 27.0.1.16 authentication pre-shared-secret 'XXXXXXXX'
set vpn ipsec site-to-site peer 27.0.1.16 description 'VPC tunnel 1'
set vpn ipsec site-to-site peer 27.0.1.16 ike-group 'AWS'
set vpn ipsec site-to-site peer 27.0.1.16 local-address '10.1.0.4'
set vpn ipsec site-to-site peer 27.0.1.16 vti bind 'vti0'
set vpn ipsec site-to-site peer 27.0.1.16 vti esp-group 'AWS'

set protocols bgp 65001 neighbor 169.254.252.25 remote-as '10124'
set protocols bgp 65001 neighbor 169.254.252.25 soft-reconfiguration 'inbound'
set protocols bgp 65001 neighbor 169.254.252.25 timers holdtime '30'
set protocols bgp 65001 neighbor 169.254.252.25 timers keepalive '30'
▼ Tunnel2の設定
set interfaces vti vti1 address '169.254.252.30/30'
set interfaces vti vti1 description 'VPC tunnel 2'
set interfaces vti vti1 mtu '1436'

set vpn ipsec site-to-site peer 27.0.1.144 authentication mode 'pre-shared-secret'
set vpn ipsec site-to-site peer 27.0.1.144 authentication pre-shared-secret 'YYYYYYYY'
set vpn ipsec site-to-site peer 27.0.1.144 description 'VPC tunnel 2'
set vpn ipsec site-to-site peer 27.0.1.144 ike-group 'AWS'
set vpn ipsec site-to-site peer 27.0.1.144 local-address '10.1.0.4'
set vpn ipsec site-to-site peer 27.0.1.144 vti bind 'vti1'
set vpn ipsec site-to-site peer 27.0.1.144 vti esp-group 'AWS'

set protocols bgp 65001 neighbor 169.254.252.29 remote-as '10124'
set protocols bgp 65001 neighbor 169.254.252.29 soft-reconfiguration 'inbound'
set protocols bgp 65001 neighbor 169.254.252.29 timers holdtime '30'
set protocols bgp 65001 neighbor 169.254.252.29 timers keepalive '30'
※ダウンロードした設定ファイルの”local-address”(Tunnel1/2)は”Customer Gateway”、VyattaのEIPの”IP Address”になっていますが、Vyattaの”Private IP Address”に書きかえる必要があります。
※ダウンロードした設定ファイルには重複した設定があり、実行すると重複エラーになったので、その部分は削除しています。
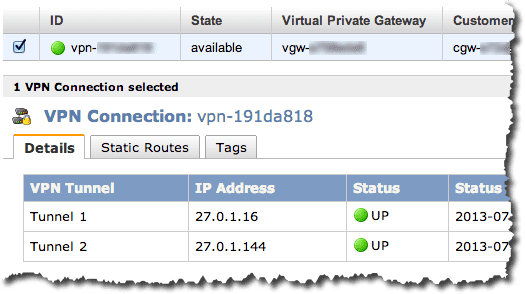
問題なければ、AWSコンソールのステータスがUPになるはずです。
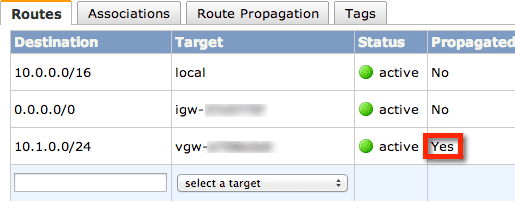
今回はBGPを利用しているので、VPN接続するサブネットの”Route Table”で、”Route Propagation”の設定を行なっておきます。
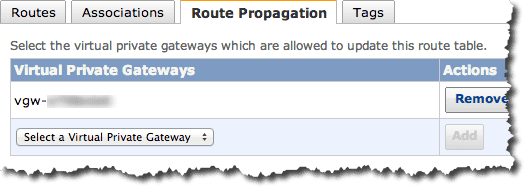
するとVPN接続が成功した場合、自動的ににVyatta側の経路情報が登録されます。
最後にVyattaからの接続確認です。
※ソースのIPを指定する必要があります。(-I 10.1.0.4)
$ sudo ping -I 10.1.0.4 10.0.0.5
PING 10.0.0.5 (10.0.0.5) from 10.1.0.4 : 56(84) bytes of data.
64 bytes from 10.0.0.5: icmp_req=1 ttl=62 time=1.12 ms
64 bytes from 10.0.0.5: icmp_req=2 ttl=62 time=1.10 ms
64 bytes from 10.0.0.5: icmp_req=3 ttl=62 time=0.996 ms
64 bytes from 10.0.0.5: icmp_req=4 ttl=62 time=1.22 ms
64 bytes from 10.0.0.5: icmp_req=5 ttl=62 time=1.17 ms
接続先(10.0.0.5)の通信状況も確認しておきます。
# tcpdump icmp
tcpdump: verbose output suppressed, use -v or -vv for full protocol decode
listening on eth0, link-type EN10MB (Ethernet), capture size 65535 bytes
00:30:26.888702 IP 10.1.0.4 > 10.0.0.5: ICMP echo request, id 3041, seq 1, length 64
00:30:26.888745 IP 10.0.0.5 > 10.1.0.4: ICMP echo reply, id 3041, seq 1, length 64
00:30:27.890103 IP 10.1.0.4 > 10.0.0.5: ICMP echo request, id 3041, seq 2, length 64
00:30:27.890136 IP 10.0.0.5 > 10.1.0.4: ICMP echo reply, id 3041, seq 2, length 64
00:30:28.891578 IP 10.1.0.4 > 10.0.0.5: ICMP echo request, id 3041, seq 3, length 64
00:30:28.891610 IP 10.0.0.5 > 10.1.0.4: ICMP echo reply, id 3041, seq 3, length 64
00:30:29.893131 IP 10.1.0.4 > 10.0.0.5: ICMP echo request, id 3041, seq 4, length 64
00:30:29.893165 IP 10.0.0.5 > 10.1.0.4: ICMP echo reply, id 3041, seq 4, length 64
00:30:30.894488 IP 10.1.0.4 > 10.0.0.5: ICMP echo request, id 3041, seq 5, length 64
00:30:30.894522 IP 10.0.0.5 > 10.1.0.4: ICMP echo reply, id 3041, seq 5, length 64
ということで、無事、接続できました。